spark 1.6.1 Standalone Mode install
我們準備兩台 ubuntu 14.04的機器,並在上面建置 spark 1.6.1 Standalone Mode,最簡易部屬,假設第一台電腦 ip為192.168.1.3,第二台電腦 ip為192.168.1.4。
1.從官網下載spark 1.6.1 ,package type 選擇: Pre-built for Hadoop 2.6 and later, 點 spark-1.6.1-bin-hadoop2.6.tgz 下載 並壓縮。
$ wget http://apache.stu.edu.tw/spark/spark-1.6.1/spark-1.6.1-bin-hadoop2.6.tgz
$ tar zxvf spark-1.6.1-bin-hadoop2.6.tgz

2. 在每台電腦安裝 java
$ sudo apt-get install openjdk-7-jdk
3. 在每台電腦家目錄 編輯 .bashrc,於最後檔案最後加上java路徑。
$vi ~/.bashrc
....
export JAVA_HOME=/usr/lib/jvm/java-7-openjdk-amd64export PATH=$JAVA_HOME/bin:$PATH
檢測是否成功:
$java -version
4.在每台電腦 編輯
$ vi /etc/hosts
192.168.1.3 ubuntu1192.168.1.4 ubuntu2
5.建立加密連線不需要密碼
$ssh-keygen -t dsa -P '' -f ~/.ssh/id_dsa
$cat ~/.ssh/id_dsa.pub >> ~/.ssh/authorized_keys
$scp -r ubuntu@192.168.1.3:~/.ssh ~
6.將ssh連線時詢問關掉。
$sudo vi /etc/ssh/ssh_config
StrictHostKeyChecking no
為了關掉下面訊息。ECDSA key fingerprint is 7e:21:58:85:c1:bb:4b:20:c8:60:7f:89:7f:3e:8f:15.
Are you sure you want to continue connecting (yes/no)?
7.設定 spark-env.sh
$ cd /spark-1.6.1-bin-hadoop2.6/conf$ mv spark-env.sh.template spark-env.sh$ vi spark-env.sh
7.設定 slaves.....export JAVA_HOME=/usr/lib/jvm/java-7-openjdk-amd64.....
$mv slaves.template slaves
$ vi slaves
#localhost
 ubuntu1
 ubuntu2
8.在spark目錄下 啟動Master 跟 slave
$sbin/start-all.sh
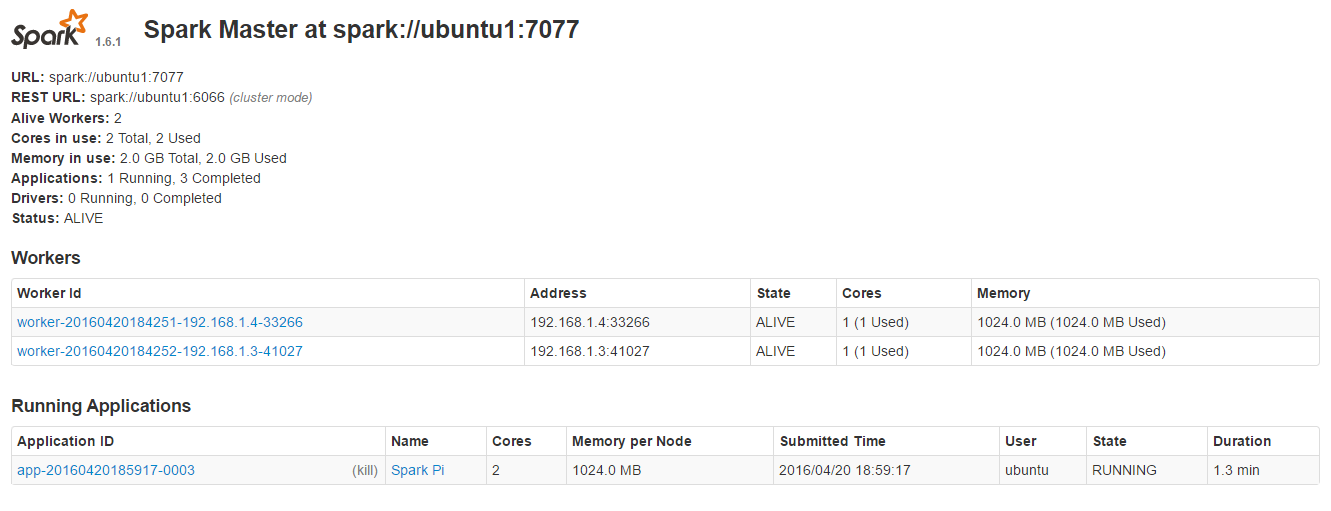
9.觀看是否已經啟動。
http://192.168.1.3:8080/
10.執行測試程式
$./bin/spark-submit \

  --class org.apache.spark.examples.SparkPi \

  --master spark://ubuntu1:7077 \

  ./lib/spark-examples-1.6.1-hadoop2.6.0.jar \

  10
以下為用相同過程建置出的環境:
✘ paslab@fastnet ~/zino/spark-1.5.1-bin-hadoop2.6 ./bin/spark-submit \
--class org.apache.spark.examples.SparkPi \
--master spark://fastnet:7077 \
--executor-memory 20G \
--total-executor-cores 100 \
./lib/spark-examples-1.5.1-hadoop2.6.0.jar \
10
Using Spark's default log4j profile: org/apache/spark/log4j-defaults.properties
16/04/22 15:57:06 INFO SparkContext: Running Spark version 1.5.1
16/04/22 15:57:06 WARN NativeCodeLoader: Unable to load native-hadoop library for your platform... using builtin-java classes where applicable
16/04/22 15:57:06 INFO SecurityManager: Changing view acls to: paslab
16/04/22 15:57:06 INFO SecurityManager: Changing modify acls to: paslab
16/04/22 15:57:06 INFO SecurityManager: SecurityManager: authentication disabled; ui acls disabled; users with view permissions: Set(paslab); users with modify permissions: Set(paslab)
16/04/22 15:57:06 INFO Slf4jLogger: Slf4jLogger started
16/04/22 15:57:06 INFO Remoting: Starting remoting
16/04/22 15:57:06 INFO Remoting: Remoting started; listening on addresses :[akka.tcp://sparkDriver@192.168.1.2:45824]
16/04/22 15:57:06 INFO Utils: Successfully started service 'sparkDriver' on port 45824.
16/04/22 15:57:06 INFO SparkEnv: Registering MapOutputTracker
16/04/22 15:57:06 INFO SparkEnv: Registering BlockManagerMaster
16/04/22 15:57:06 INFO DiskBlockManager: Created local directory at /tmp/blockmgr-654fc5a5-2c10-4cf9-90d0-aaa46dd6259d
16/04/22 15:57:07 INFO MemoryStore: MemoryStore started with capacity 530.3 MB
16/04/22 15:57:07 INFO HttpFileServer: HTTP File server directory is /tmp/spark-aea15ac1-2dfa-445a-aef4-1859becb1ee6/httpd-73c0986a-57f6-4b0b-9fc4-9f84366393c9
16/04/22 15:57:07 INFO HttpServer: Starting HTTP Server
16/04/22 15:57:07 INFO Utils: Successfully started service 'HTTP file server' on port 35012.
16/04/22 15:57:07 INFO SparkEnv: Registering OutputCommitCoordinator
16/04/22 15:57:07 INFO Utils: Successfully started service 'SparkUI' on port 4040.
16/04/22 15:57:07 INFO SparkUI: Started SparkUI at http://192.168.1.2:4040
16/04/22 15:57:07 INFO SparkContext: Added JAR file:/home/paslab/zino/spark-1.5.1-bin-hadoop2.6/./lib/spark-examples-1.5.1-hadoop2.6.0.jar at http://192.168.1.2:35012/jars/spark-examples-1.5.1-hadoop2.6.0.jar with timestamp 1461311827975
16/04/22 15:57:08 WARN MetricsSystem: Using default name DAGScheduler for source because spark.app.id is not set.
16/04/22 15:57:08 INFO AppClient$ClientEndpoint: Connecting to master spark://fastnet:7077...
16/04/22 15:57:08 INFO SparkDeploySchedulerBackend: Connected to Spark cluster with app ID app-20160422155708-0000
16/04/22 15:57:08 INFO AppClient$ClientEndpoint: Executor added: app-20160422155708-0000/0 on worker-20160422155620-192.168.1.2-43391 (192.168.1.2:43391) with 12 cores
16/04/22 15:57:08 INFO SparkDeploySchedulerBackend: Granted executor ID app-20160422155708-0000/0 on hostPort 192.168.1.2:43391 with 12 cores, 20.0 GB RAM
16/04/22 15:57:08 INFO AppClient$ClientEndpoint: Executor added: app-20160422155708-0000/1 on worker-20160422155623-192.168.1.3-47961 (192.168.1.3:47961) with 12 cores
16/04/22 15:57:08 INFO SparkDeploySchedulerBackend: Granted executor ID app-20160422155708-0000/1 on hostPort 192.168.1.3:47961 with 12 cores, 20.0 GB RAM
16/04/22 15:57:08 INFO AppClient$ClientEndpoint: Executor updated: app-20160422155708-0000/0 is now RUNNING
16/04/22 15:57:08 INFO AppClient$ClientEndpoint: Executor updated: app-20160422155708-0000/1 is now RUNNING
16/04/22 15:57:08 INFO AppClient$ClientEndpoint: Executor updated: app-20160422155708-0000/0 is now LOADING
16/04/22 15:57:08 INFO AppClient$ClientEndpoint: Executor updated: app-20160422155708-0000/1 is now LOADING
16/04/22 15:57:08 INFO Utils: Successfully started service 'org.apache.spark.network.netty.NettyBlockTransferService' on port 46316.
16/04/22 15:57:08 INFO NettyBlockTransferService: Server created on 46316
16/04/22 15:57:08 INFO BlockManagerMaster: Trying to register BlockManager
16/04/22 15:57:08 INFO BlockManagerMasterEndpoint: Registering block manager 192.168.1.2:46316 with 530.3 MB RAM, BlockManagerId(driver, 192.168.1.2, 46316)
16/04/22 15:57:08 INFO BlockManagerMaster: Registered BlockManager
16/04/22 15:57:08 INFO SparkDeploySchedulerBackend: SchedulerBackend is ready for scheduling beginning after reached minRegisteredResourcesRatio: 0.0
16/04/22 15:57:08 INFO SparkContext: Starting job: reduce at SparkPi.scala:36
16/04/22 15:57:08 INFO DAGScheduler: Got job 0 (reduce at SparkPi.scala:36) with 10 output partitions
16/04/22 15:57:08 INFO DAGScheduler: Final stage: ResultStage 0(reduce at SparkPi.scala:36)
16/04/22 15:57:08 INFO DAGScheduler: Parents of final stage: List()
16/04/22 15:57:08 INFO DAGScheduler: Missing parents: List()
16/04/22 15:57:08 INFO DAGScheduler: Submitting ResultStage 0 (MapPartitionsRDD[1] at map at SparkPi.scala:32), which has no missing parents
16/04/22 15:57:08 INFO MemoryStore: ensureFreeSpace(1888) called with curMem=0, maxMem=556038881
16/04/22 15:57:08 INFO MemoryStore: Block broadcast_0 stored as values in memory (estimated size 1888.0 B, free 530.3 MB)
16/04/22 15:57:08 INFO MemoryStore: ensureFreeSpace(1202) called with curMem=1888, maxMem=556038881
16/04/22 15:57:08 INFO MemoryStore: Block broadcast_0_piece0 stored as bytes in memory (estimated size 1202.0 B, free 530.3 MB)
16/04/22 15:57:08 INFO BlockManagerInfo: Added broadcast_0_piece0 in memory on 192.168.1.2:46316 (size: 1202.0 B, free: 530.3 MB)
16/04/22 15:57:08 INFO SparkContext: Created broadcast 0 from broadcast at DAGScheduler.scala:861
16/04/22 15:57:08 INFO DAGScheduler: Submitting 10 missing tasks from ResultStage 0 (MapPartitionsRDD[1] at map at SparkPi.scala:32)
16/04/22 15:57:08 INFO TaskSchedulerImpl: Adding task set 0.0 with 10 tasks
16/04/22 15:57:10 INFO SparkDeploySchedulerBackend: Registered executor: AkkaRpcEndpointRef(Actor[akka.tcp://sparkExecutor@192.168.1.2:50829/user/Executor#1430081976]) with ID 0
16/04/22 15:57:10 INFO TaskSetManager: Starting task 0.0 in stage 0.0 (TID 0, 192.168.1.2, PROCESS_LOCAL, 2161 bytes)
16/04/22 15:57:10 INFO TaskSetManager: Starting task 1.0 in stage 0.0 (TID 1, 192.168.1.2, PROCESS_LOCAL, 2161 bytes)
16/04/22 15:57:10 INFO TaskSetManager: Starting task 2.0 in stage 0.0 (TID 2, 192.168.1.2, PROCESS_LOCAL, 2161 bytes)
16/04/22 15:57:10 INFO TaskSetManager: Starting task 3.0 in stage 0.0 (TID 3, 192.168.1.2, PROCESS_LOCAL, 2161 bytes)
16/04/22 15:57:10 INFO TaskSetManager: Starting task 4.0 in stage 0.0 (TID 4, 192.168.1.2, PROCESS_LOCAL, 2161 bytes)
16/04/22 15:57:10 INFO TaskSetManager: Starting task 5.0 in stage 0.0 (TID 5, 192.168.1.2, PROCESS_LOCAL, 2161 bytes)
16/04/22 15:57:10 INFO TaskSetManager: Starting task 6.0 in stage 0.0 (TID 6, 192.168.1.2, PROCESS_LOCAL, 2161 bytes)
16/04/22 15:57:10 INFO TaskSetManager: Starting task 7.0 in stage 0.0 (TID 7, 192.168.1.2, PROCESS_LOCAL, 2161 bytes)
16/04/22 15:57:10 INFO TaskSetManager: Starting task 8.0 in stage 0.0 (TID 8, 192.168.1.2, PROCESS_LOCAL, 2161 bytes)
16/04/22 15:57:10 INFO TaskSetManager: Starting task 9.0 in stage 0.0 (TID 9, 192.168.1.2, PROCESS_LOCAL, 2161 bytes)
16/04/22 15:57:10 INFO SparkDeploySchedulerBackend: Registered executor: AkkaRpcEndpointRef(Actor[akka.tcp://sparkExecutor@192.168.1.3:45907/user/Executor#-348604070]) with ID 1
16/04/22 15:57:10 INFO BlockManagerMasterEndpoint: Registering block manager 192.168.1.2:35234 with 10.4 GB RAM, BlockManagerId(0, 192.168.1.2, 35234)
16/04/22 15:57:10 INFO BlockManagerMasterEndpoint: Registering block manager 192.168.1.3:36667 with 10.4 GB RAM, BlockManagerId(1, 192.168.1.3, 36667)
16/04/22 15:57:11 INFO BlockManagerInfo: Added broadcast_0_piece0 in memory on 192.168.1.2:35234 (size: 1202.0 B, free: 10.4 GB)
16/04/22 15:57:11 INFO TaskSetManager: Finished task 8.0 in stage 0.0 (TID 8) in 1057 ms on 192.168.1.2 (1/10)
16/04/22 15:57:11 INFO TaskSetManager: Finished task 5.0 in stage 0.0 (TID 5) in 1060 ms on 192.168.1.2 (2/10)
16/04/22 15:57:11 INFO TaskSetManager: Finished task 3.0 in stage 0.0 (TID 3) in 1120 ms on 192.168.1.2 (3/10)
16/04/22 15:57:11 INFO TaskSetManager: Finished task 2.0 in stage 0.0 (TID 2) in 1124 ms on 192.168.1.2 (4/10)
16/04/22 15:57:11 INFO TaskSetManager: Finished task 0.0 in stage 0.0 (TID 0) in 1161 ms on 192.168.1.2 (5/10)
16/04/22 15:57:11 INFO TaskSetManager: Finished task 1.0 in stage 0.0 (TID 1) in 1146 ms on 192.168.1.2 (6/10)
16/04/22 15:57:11 INFO TaskSetManager: Finished task 9.0 in stage 0.0 (TID 9) in 1142 ms on 192.168.1.2 (7/10)
16/04/22 15:57:11 INFO TaskSetManager: Finished task 4.0 in stage 0.0 (TID 4) in 1149 ms on 192.168.1.2 (8/10)
16/04/22 15:57:11 INFO TaskSetManager: Finished task 7.0 in stage 0.0 (TID 7) in 1148 ms on 192.168.1.2 (9/10)
16/04/22 15:57:11 INFO TaskSetManager: Finished task 6.0 in stage 0.0 (TID 6) in 1149 ms on 192.168.1.2 (10/10)
16/04/22 15:57:11 INFO TaskSchedulerImpl: Removed TaskSet 0.0, whose tasks have all completed, from pool
16/04/22 15:57:11 INFO DAGScheduler: ResultStage 0 (reduce at SparkPi.scala:36) finished in 2.419 s
16/04/22 15:57:11 INFO DAGScheduler: Job 0 finished: reduce at SparkPi.scala:36, took 2.622159 s
Pi is roughly 3.144648
16/04/22 15:57:11 INFO SparkUI: Stopped Spark web UI at http://192.168.1.2:4040
16/04/22 15:57:11 INFO DAGScheduler: Stopping DAGScheduler
16/04/22 15:57:11 INFO SparkDeploySchedulerBackend: Shutting down all executors
16/04/22 15:57:11 INFO SparkDeploySchedulerBackend: Asking each executor to shut down
16/04/22 15:57:11 INFO MapOutputTrackerMasterEndpoint: MapOutputTrackerMasterEndpoint stopped!
16/04/22 15:57:11 INFO MemoryStore: MemoryStore cleared
16/04/22 15:57:11 INFO BlockManager: BlockManager stopped
16/04/22 15:57:11 INFO BlockManagerMaster: BlockManagerMaster stopped
16/04/22 15:57:11 INFO SparkContext: Successfully stopped SparkContext
16/04/22 15:57:11 INFO OutputCommitCoordinator$OutputCommitCoordinatorEndpoint: OutputCommitCoordinator stopped!
16/04/22 15:57:11 INFO ShutdownHookManager: Shutdown hook called
16/04/22 15:57:11 INFO ShutdownHookManager: Deleting directory /tmp/spark-aea15ac1-2dfa-445a-aef4-1859becb1ee6